Thursday, December 8, 2011

What is Cursor?Purpose of Cursor?Advantage and Disadvantage of Cursor.


Whenever we are processing sql statement SQL allots PRIVATE SQL AREA OR WORK AREA to store porcessed information. Cursor is a pointer to this private sql area.
Oracle automatically creates an implicit cursor for each sql statement.
If you want to handle and control processing of each row of data explicitly you may define explicit cursor.

A cursor is a set of rows together with a pointer that identifies a current row.

In other word, Cursor is a database object used by applications to manipulate data in a set on a row-by-row basis.

For Example:If you need to insert/update/delete bunch of data one by one, you have to use a cursor with a while loop. It’s not a good behavior to use loops in SQL but sometimes you have to use them. Anyway if you don’t know how to define and use a cursor, you may take a look at the code snippet below. Or maybe you may always forget how to define one like me ;o))

Steps for cursor

1. DECLARE CURSOR

2.
OPEN

3.
FETCH

4.
@@FETCH_STATUS

5.
CLOSE


6.DEALLOCATE CURSORS

DisAdvantage of Cursors

A cursor is a memory resident set of pointers -- meaning it occupies memory from your system that may be available for other processes. Poorly written cursors can completely deplete available memory. Means it consumes more Resources

Advantage of Cursors

Cursors can be faster than a while loop but they do have more overhead. Another advatage is that it is we can do RowWise validation or in other way you can perform operation on each Row.It is a Data Type which is used to define multivalue variable.

But one factor affecting cursor speed is the number of rows and columns brought into the cursor. Time how long it takes to open your cursor and fetch statements. If it's lengthy, look carefully at your cursor logic; see if you can remove columns from the declare statement, and change your where clause in the declare statement to only return rows the cursor needs. If the fetch statements themselves are lengthy or consuming too much IO or CPU, look at the cursor declare statement and ensure you have optimal indexes in place on your base tables or temporary tables.

Thursday, November 10, 2011

State Management:Cookie

In This Post I will show You what is Cookie,How to use it and what is advantage and Limitation of cookie..

What is Cookie?

A cookie is a small bit of text that accompanies requests and pages as they go between the Web
server and browser. The cookie contains information the Web application can read whenever the user visits the site.Imagine that when users request a page from your site, www.Example.com, your application sends not just a page, but a cookie containing the date and time. When the user's browser gets the page, the browser also gets the cookie, which it stores in a folder on the user's hard disk.Later, the user requests a page from your site again. When the user enters the URL
www.contoso.com, the browser looks on the local hard disk for a cookie associated with the URL. If the cookie exists, the browser sends the cookie to your site along with the page request. Your
application can then determine the date and time that the user last visited the site. You might use the information to display a message to the user, check an expiration date, or perform any other useful function.

Limitation of Cookies?
Before we start on the mechanics of working with cookies, I will mention a couple of limitations of
working with cookies. Most browsers support cookies of up to 4096 bytes. That is plenty of space for storing a few values on the user's computers, but you would not want to try to store a dataset or some other potentially large piece of data in a cookie. More practically, you probably do not want to store a big collection of user information in a cookie. Instead, you would want to store a user number or other identifier. Then, when the user visits your site again, you would use the user ID to look up user details in a database. (But see Cookies and Security for some caveats about storing user information.)
Browsers also impose limitations on how many cookies your site can store on the user's computer. Most browsers allow only 20 cookies per site; if you try to store more, the oldest cookies are discarded. Some browsers also put an absolute limit, usually 300, on the number of cookies they will accept from all sites combined.

How To Add(write) Cookie...

Example
HttpCookie cookie = new HttpCookie("BackgroundColor");
cookie.Value = "green";
cookie.Expires = DateTime.Now.AddDays(1);
Response.Cookies.Add(cookie);

Read Cookie

string color=Request.Cookies["BackgroundColor"].Value;

Delete Cookie

HttpCookie cookie = new HttpCookie("BackgroundColor");
cookie.Value = "green";
cookie.Expires =DateTime.Now.AddDays(-1);
Response.Cookies.Add(cookie);


Store Multiple values in cookie and Read it.

HttpCookie userCookie = new HttpCookie("UserInfo");
userCookie["Country"] = "Italy";
userCookie["City"] = "Rome";
userCookie["Name"] = "Jones";
userCookie.Expires = DateTime.Now.AddDays(3);
Response.Cookies.Add(userCookie);
Label1.Text = "Cookie create successful!";
HttpCookie cookie = Request.Cookies["UserInfo"];
if (cookie != null)
{
string country = cookie["Country"];
string city = cookie["City"];
string name = cookie["Name"];
Label2.Text = "Cookie Found and read";
Label2.Text += "Name: " + name;
Label2.Text += "Country: " + country;
Label2.Text += "City: " + city;
}

Monday, November 7, 2011

Static and Dynamic web pages

We can broadly classify web sites and web pages into two categories:

1. Static web pages
2. Dynamic web pages

Static Web Pages


A static web page is a page which has the same content always.

In case of static web pages, content is written in the page itself as plain html. Until the author of the web page updates the content, the content remains the same in the static pages.

Static web pages are meant for providing information which does not change often. For example, visithttp://www.google.com/intl/en/about.html. This page is a static page. The content is always the same (until they update the content by uploading a new html file to the web server).

HTML files are used to create static web pages.

Dynamic Web Pages


Dynamic web pages get content from database. Content is NOT hard-coded in the page itself.

Dynamic pages are created using "serverside code" when the page is loaded every time.

An example for a dynamic page is this tutorial page itself. See the file name in the URL. The file name is "Tutorial8.aspx". We have used only one file to display any tutorial chapter. The chapter number is there as part of the URL (the chapter number is 8 for this chapter).

When you type the URL in the browser, this page is dynamically created from database, based on the chapter id in the URL. The content of each chapter is stored in our database, not in the file itself. When you access the page, our server side code will check what is the TutorialId in the URL. Based on the TutorialId, it will retrieve appropriate chapter content from the database and dynamically create the web page. (You can try to change the TutorialId in the URL to some very large number and try. The page will give an error because our code will fail to get the corresponding chapter content from the database). This entire site has only very few files (like index.aspx, Tutorial.aspx etc)

Dynamic web pages are created using technologies like ASP, ASP.NET, PHP etc.

HTML pages cannot be dynamic. All HTML files are static pages. If you want to write dynamic pages, you must use some technologies like ASP.NET.

Wednesday, November 2, 2011

How To use MD5 in asp.Net.

Introduction

Its quite simple to use MD5 in asp.Net.its a one type of Encryption Method.It is basically used for high security.because it is not possible to decrypt the encrypted string using MD5.MD5 is a one way function thats why it is impossible to decrypt it.

For Example..

This is .aspx code


Just click on image to see it well.


Now in aspx.cs page code....
Add namespace using System.Web.Security;

protected void btnEncrypt_Click(object sender, EventArgs e)
{
lblEncryptAns.Text = FormsAuthentication.HashPasswordForStoringInConfigFile(txtPassword.Text,"MD5");

}

Now see the text of
lblEncryptAns and Encrypt again with the Output Result.Then You will get the Original string it will show you the different string.

Monday, October 17, 2011

Set the fix column width in gridview and if content is bigger than the column width than break the word...


The simple example is shown here.........

Tuesday, October 4, 2011

how to create Windows Service in c# or windows service sample in c#

Introduction:

Here I will explain what windows service is, uses of windows service and how to create windows service in c#.

Description:


Today I am writing article to explain about windows services. First we will see what a window service is and uses of windows service and then we will see how to create windows service.

What is Windows Service?

Windows Services are applications that run in the background and perform various tasks. The applications do not have a user interface or produce any visual output. Windows Services are started automatically when computer is booted. They do not require a logged in user in order to execute and can run under the context of any user including the system. Windows Services are controlled through the Service Control Manager where they can be stopped, paused, and started as needed.

Create a Windows Service

Creating Windows Service is very easy with visual studio just follow the below steps to create windows service
Open visual studio --> Select File --> New -->Project--> select Windows Service
And give name as WinServiceSample


After give WinServiceSample name click ok button after create our project that should like this


In Solution explorer select Service1.cs file and change Service1.cs name to ScheduledService.csbecause in this project I am using this name if you want to use another name for your service you should give your required name.

After change name of service open ScheduledService.cs in design view right click and select Propertiesnow one window will open in that change Name value to ScheduledService and change ServiceName toScheduledService. Check below properties window that should be like this


After change Name and ServiceName properties again open ScheduledService.cs in design view and right click on it to Add Installer files to our application.

The main purpose of using Windows Installer is an installation and configuration service provided with Windows. The installer service enables customers to provide better corporate deployment and provides a standard format for component management.

After click on Add installer a designer screen added to project with 2 controls:serviceProcessInstaller1 and ServiceInstaller1

Now right click on serviceProcessInstaller1 and select properties in that change Account toLocalSystem


After set those properties now right click on ServiceInstaller1 and change following StartType property to Automatic and give proper name for DisplayName property


After completion of setting all the properties now we need to write the code to run the windows services at scheduled intervals.

If you observe our project structure that contains Program.cs file that file contains Main() method otherwise write the Main() method like this in Program.cs file

///
/// The main entry point for the application.
///
static void Main()
{
ServiceBase[] ServicesToRun;
ServicesToRun = new ServiceBase[]
{
new ScheduledService()
};
ServiceBase.Run(ServicesToRun);
}
After completion of adding Main() method open ScheduledService.cs file and add following namespaces in codebehind of ScheduledService.cs file

using System.IO;
using System.Timers;
If you observe code behind file you will find two methods those are

protected override void OnStart(string[] args)
{
}

protected override void OnStop()
{
}
We will write entire code in these two methods to start and stop the windows service. Write the following code in code behind to run service in scheduled intervals
//Initialize the timer
Timer timer = new Timer();
public ScheduledService()
{
InitializeComponent();
}
//This method is used to raise event during start of service
protected override void OnStart(string[] args)
{
//add this line to text file during start of service
TraceService("start service");

//handle Elapsed event
timer.Elapsed += new ElapsedEventHandler(OnElapsedTime);

//This statement is used to set interval to 1 minute (= 60,000 milliseconds)

timer.Interval = 60000;

//enabling the timer
timer.Enabled = true;
}
//This method is used to stop the service
protected override void OnStop()
{
timer.Enabled = false;
TraceService("stopping service");
}
private void OnElapsedTime(object source, ElapsedEventArgs e)
{
TraceService("Another entry at "+DateTime.Now);
}
private void TraceService(string content)
{

//set up a filestream
FileStream fs = new FileStream(@"d:\ScheduledService.txt",FileMode.OpenOrCreate, FileAccess.Write);

//set up a streamwriter for adding text
StreamWriter sw = new StreamWriter(fs);

//find the end of the underlying filestream
sw.BaseStream.Seek(0, SeekOrigin.End);

//add the text
sw.WriteLine(content);
//add the text to the underlying filestream

sw.Flush();
//close the writer
sw.Close();
}

If you observe above code in OnStart method I written event ElapsedEventHandler this event is used to run the windows service for every one minute

After completion code writing build the application and install windows service.

Now the service is installed. To start and stop the service, go to Control Panel --> Administrative Tools --> Services. Right click the service and select Start.

Now the service is started, and you will be able to see entries in the log file we defined in the code.

Now open the log file in your folder that Output of the file like this


To build your service project

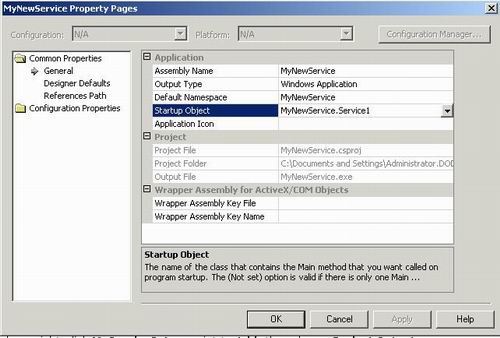
  1. In Solution Explorer, right-click your project and select Properties from the shortcut menu. The project'sProperty Pages dialog box appears.
  2. In the left pane, select the General tab in the Common Properties folder.
  3. From the Startup object list, choose MyNewService. Click OK.
  4. Press Ctrl+Shift+B to build the project.

Service Project Property Page

Now that the project is built, it can be deployed. A setup project will install the compiled project files and run the installers needed to run the Windows service. To create a complete setup project, you will need to add the projectoutput, MyNewService.exe, to the setup project and then add a custom action to have MyNewService.exe installed.

To create a setup project for your service

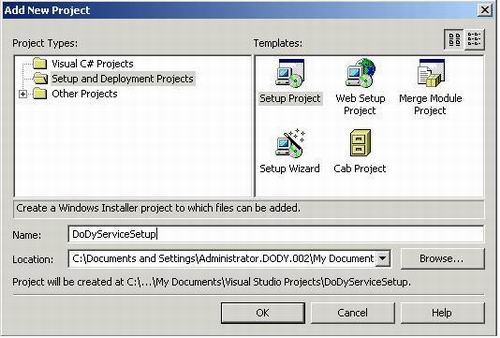
  1. On the File menu, point to Add Project, and then choose New Project.
  2. In the Project Types pane, select the Setup and Deployment Projects folder.
  3. In the Templates pane, select Setup Project. Name the project MyServiceSetup.

A setup project is added to the solution. Next you will add the output from the Windows service project,MyNewService.exe, to the setup.

Service Setup Project

To add MyNewService.exe to the setup project

  1. In Solution Explorer, right-click MyServiceSetup, point to Add, then choose Project Output. The Add ProjectOutput Group dialog box appears.
  2. MyNewService is selected in the Project box.
  3. From the list box, select Primary Output, and click OK.

    A project item for the primary output of MyNewService is added to the setup project. Now add a custom action to install the MyNewService.exe file.

To add a custom action to the setup project

  1. In Solution Explorer, right-click the setup project, point to View, then choose Custom Actions. The Custom Actions editor appears.
  2. In the Custom Actions editor, right-click the Custom Actions node and choose Add Custom Action. The Select Item in Project dialog box appears.
  3. Double-click the application folder in the list box to open it, select primary output from MyNewService(Active), and click OK. The primary output is added to all four nodes of the custom actions � Install, Commit, Rollback, and Uninstall.
  4. Build the setup project.

To install the Windows Service

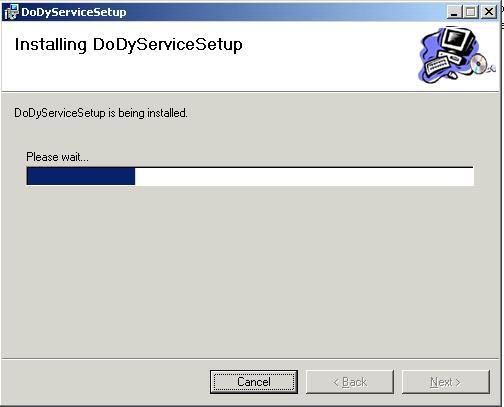
Browse to the directory where the setup project was saved, and run the .msi file to install MyNewService.exe.

Service Setup

To start and stop your service

  1. Open the Services Control Manager by doing one of the following:
    • In Windows 2000 Professional, right-click My Computer on the desktop, then click Manage. In theComputer Management console, expand the Services and Applications node.

      - Or -

    • In Windows 2000 Server, click Start, point to Programs, click Administrative Tools, and then clickServices.

      Note: In Windows NT version 4.0, you can open this dialog box from Control Panel.

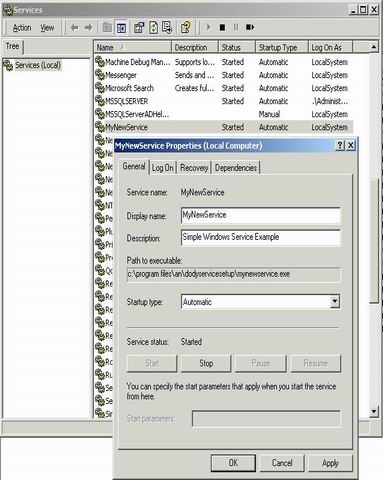
  2. You should now see MyNewService listed in the Services section of the window.
  3. Select your service in the list, right-click it, and then click Start.

Right-click the service, and then click Stop.

Admin tools Services

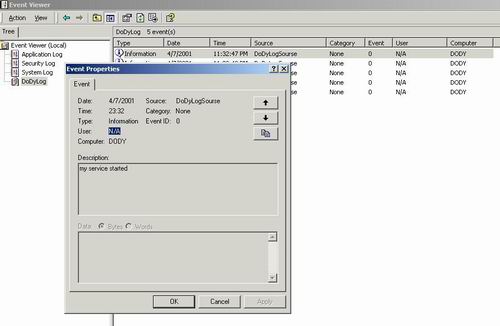
To verify the event log output of your service

  1. Open Server Explorer and access the Event Logs node. For more information, see Working with Event Logs in Server Explorer.

    Note: The Servers node of Server Explorer is not available in the Standard Edition of Visual Basic and Visual C# .NET.

    Sample screenshot

To uninstall your service

  • On the Start menu, open Control Panel and click Add/Remove Programs, and then locate your service and clickUninstall.
  • You can also uninstall the program by right-clicking the program icon for the .msi file and selecting Uninstall

Another Way Of Installation

how to install window service using command prompt or install/uninstall .NET Window service.


Introduction:

Here I will explain how to install windows service and how to start the windows service in our local machine.

Description:

I will explain how to install windows service in our system.

To install windows service in your follow these steps

Start --> All Programs --> Microsoft Visual Studio 2008 --> Visual Studio Tools --> Open Visual Studio Command Prompt

After open command prompt point to your windowsservice.exe file in your project
Initially in our command prompt we are able to see path like this

C:\Program Files\ Microsoft Visual Studio 9.0\VC >

This path is relating to our visual studio installation path because during installation if you give different path this path should be different now we can move to folder which contains our windowsservice.exefile. After moving to exe file exists path my command prompt like this

After moving to our windowsservice.exe contains folder now type

Installutil windowsservicesample.exe (Give your windows service exe file name) and now press enter button.

After type Installutil windowsservicesample.exe file that would be like this

After that the service will install successfully in your system.

Now I have question do you have idea on how to see installed windows services and how to start our windows service if you have idea good otherwise no need to panic just follow below steps

Start --> Control Panel --> Open Control Panel --> Select Administrative Tools --> Computer Management --> Services and Applications --> Services --> Open services

Now check for your windows service name and right click on that and select option start your windows service has started successfully

That would be like this


Delete Service

First Way

Start --> Run --> Type Regedit or Regedt32 and click enter button now one window will open like this

After that open following registry entry

HKEY_LOCAL_MACHINE/SYSTEM/CurrentControlSet/Services

After open services check for your service and delete it.

Second Way

First select your windows service name and open command prompt here if you using Windows 7 or Vista you’ll need to right-click the command prompt and choose Run as Administrator. We’ll use the sc command to actually do the work.

The syntax used to delete a service is this:

sc delete ServiceName

For example to delete service it would be like this

EX: sc delete “WinServiceSample”